by Jan Dunn, MS
Welcome to part three of our “core control series”! If you’ve missed the others, you’ll find part one here, and part two here. Enjoy!
Core Exercises
Now we are ready to actually do some “core” exercises! This one actively involves the TA (transverse abdominal) that we discussed in Part 1 – but remember that “core” really means back stabilization, and these kinds of exercises utilize all of the muscles we discussed in Part 1, even if we’re consciously focusing on only one of them, as in this next exercise.
Lying on your back, in NP, place your hands on your lower belly, as in the photo here:
As you inhale (remembering all your cues above for a nice full breath), feel your belly rise slightly. Now, as you exhale, let your belly fall inwards, away from your hands. Don’t lose your NP as you do this–the whole point of the exercise is to use the TA in a NP position, where it is working to best help stabilize your back. Many dancers (and non-dancers) want to flatten their back / lose NP when they first try this – so watch out for that!
It’s also important not to “suck your belly to your spine”. The TA doesn’t need to work on 100% contraction (which that cue tends to do) to be effective (in a healthy back, it’s working at only about 30% of it’s full capacity).
This simple exercise is just initial awareness / training for how to activate the TA in a neutral position. If it’s easy for you, great. If not, and you find yourself wanting to “tuck” / flatten your back, then this would be a good one to practice daily, until that habit of “tucking” is no longer there.
Now we’re going to do some back stabilization exercises that may be more challenging (or maybe not!):
But before we do, a few words on the breathing pattern that will best help you with these:
Generally speaking, we stabilize our back best when we exhale with exertion –in other words, the hard part of the exercise. So for example, on the first exercise below, you exhale as you lift your leg.
Another thing to realize about breath use is that a forced exhale actually overuses the oblique abdominals, and does not allow the TA to fully engage. I’ve actually seen this on diagnostic ultrasound, and it was fascinating–when the dancer forcibly exhaled, you could actually see, on the screen, how the TA was not working, but the oblique abdominals were working way too hard (“hypertrophying” in scientific language). So just taking a normal inhale / exhale will serve you best.
Leg Lift Core Exercise
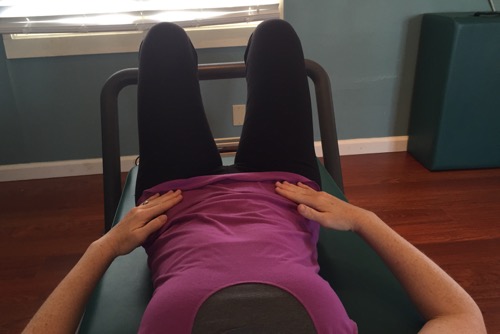
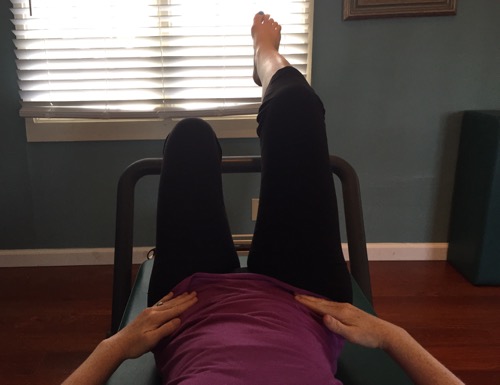
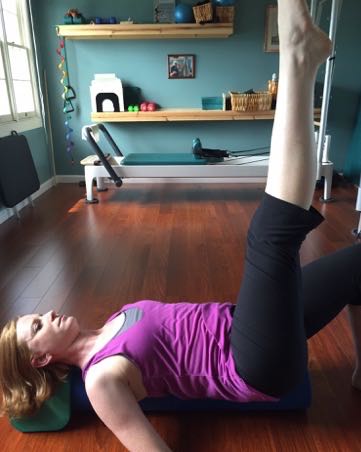
Still lying on your back, and maintaining your NP, knees bent, lift first one leg, then the other (on the exhale phase of your breath) – keeping your back absolutely stable / no movement at all. In the first photo, Sarah is lifting her leg with no pelvic / back movement:
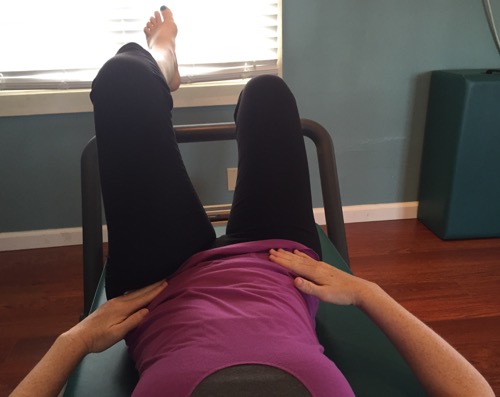
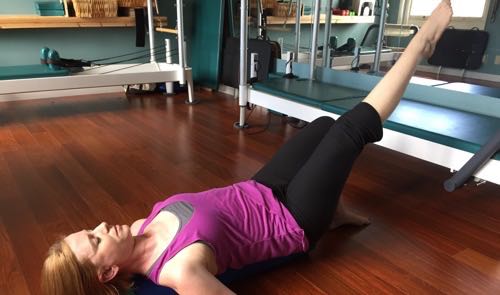
But in the other, she is losing her back stability, and you can see her pelvis tilting to one side:
Good cues that I like to help avoid that tilt are:
-imagine “grounding” on the opposite side from the leg you are lifting-an image such as a tree root growing down through your hip and pelvis, and your standing leg growing down as well.
-imagine a hand pressing down on that opposite hip (you can use your own hand to actually do this).
-a carpenter’s level sitting on your low belly, and the little bead in the center has to stay exactly center (or that plate with the marble in the center!).
This exercise uses the TA, but it also is bringing more of the Multifidus (MTF) into play — in the lower back. And it works in opposition – when you lift your Right leg, it’s the Left MTF that are working harder, and vv – hence the cues that are focused on the opposition hip.
Much harder, more advanced versions of this exercise would be (all with total NP and back stabilization):
- bringing the legs up to rest on your belly and tilting first one / then the other, and eventually both at the same time, without losing your back stabilization.
- With legs on your belly, extending one leg out, then the other.
- The closer to the floor your leg, the harder the work for the TA/ MTF and other muscles to stabilize your back.
You probably know more versions of this as well–but onward to our next challenge!
Leg Fall-Out Core Exercise
This one involves taking one leg out to the side, without losing the back stability–in this case, your pelvis might want to really tilt to one side. It works like this:
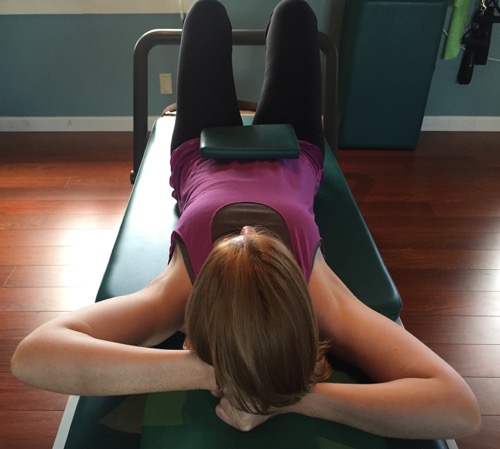
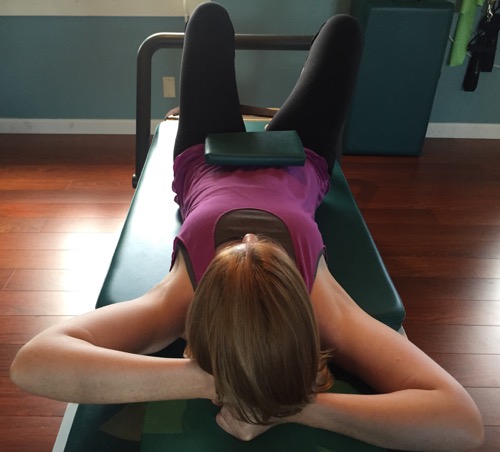
Still lying on your back, in NP, place a light book / DVD case right on the pelvic triangle (something really lightweight) – see the photo – this is just for visual self-feedback:
Prop your head up on a real pillow, or use your fists as a cushion, so you can look at your pelvis (don’t just hold your head up in your hands and look – that can be too much neck strain).
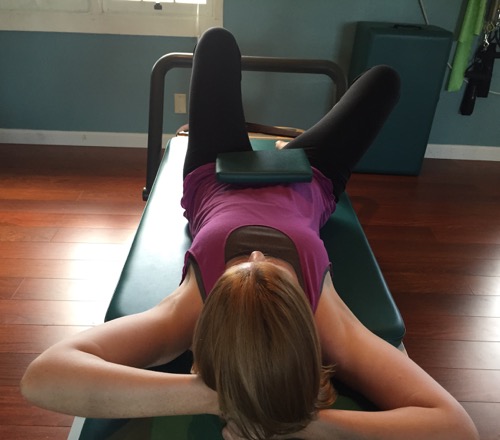
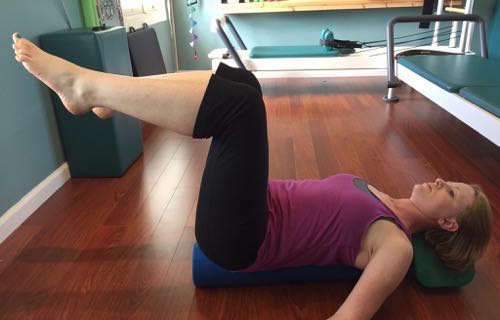
Keeping that book / case absolutely level, slowly let one leg start to fall out to the side:
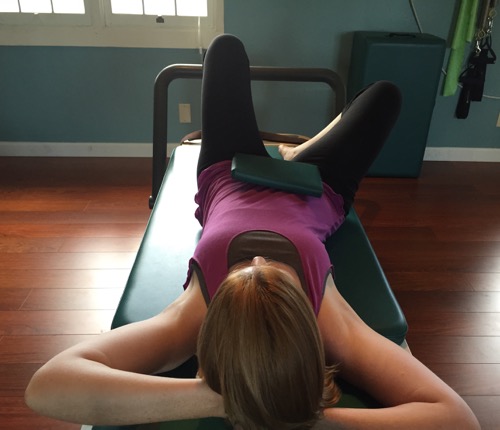
This is harder than it looks! You can see Sarah moving her leg further to the side in the next photo, still keeping stable:
Your goal is to open it as far as you can, without tilting your pelvis:
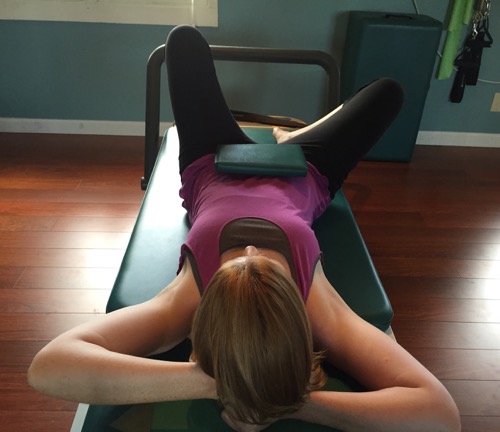
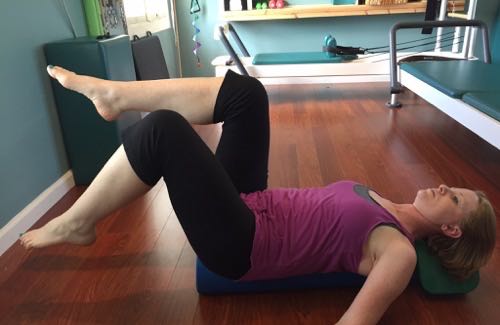
One thing to watch out for, in addition to the tilting pelvis–the opposite leg usually wants to fall out in compensation:
Don’t let that happen — keep your standing leg straight to the ceiling.
This exercise also very much involves the MTF, so those “grounding” cues work really well here.
Foam Roller Core Exercises
These next ones are a step up in terms of challenging the back stabilization. For these you need a foam roller–one of my all time favorite toys! When you do back stabilization exercises on an unstable surface, it makes the muscles involved work harder.
Side To Side Rolling
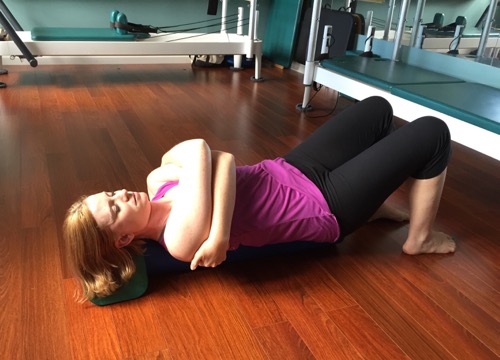
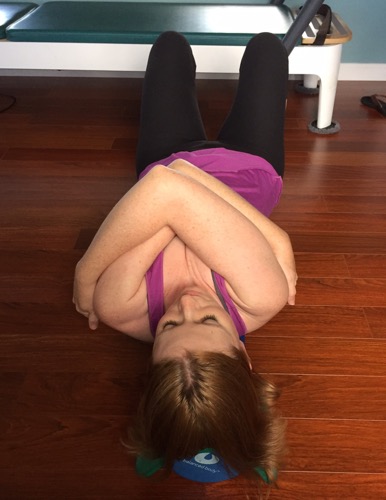
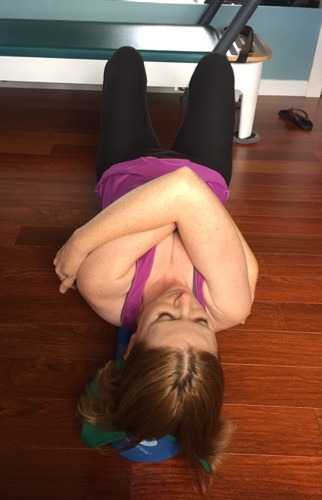
Lying lengthwise on the roller, feet on the floor / knees bent and straight to the ceiling / feet in parallel, a few inches apart – arms on crossed on your chest, (hopefully relaxed, not gripping – cross them so that elbows are together, and hands just relaxing).
Now you’re going to try rolling from side to side, with eyes closed:
You are trying to go as far as you can without falling off. Keep your feet where they are! They will want to compensate by scooting further apart, which makes the exercise easier.
Let your head roll or not, as comfortable (i.e, don’t hold it in an uncomfortable position), but do keep your eyes closed.
I usually do about 8 R-L, alternating.
Leg Lift On Foam Roller
This one has several steps, each one getting harder.
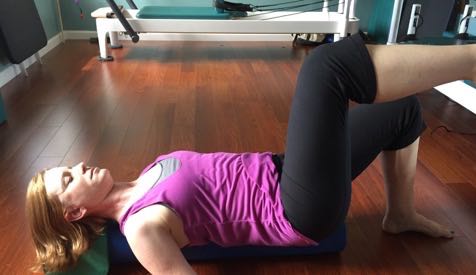
Step One: hands on the floor, lift each leg alternately (remember to always do that leg lift on an exhale). Then try the same thing without hands (let them hover just off the floor, so that you can use it if needed!).
This is much harder than it sounds, and most people will almost immediately find that one side is harder than the other. This exercise again involves the MTF, and can show weaknesses on one side or the other (in Dance Screenings, I always use this exercise to test the dancer’s “core stability”).
If you find that one side is harder, use your “grounding” cues to help stabilize….6-8 repetitions on each side, alternating.
Step Two: do the leg lift, then extend (develope) the leg to the ceiling–hands off the floor!
Alternate R – L, again 6-8 times each.
Step Three: This time lift the leg, extend, and then lower down (only as low as your pelvis, not to the floor) and lift it up again –i.e, a battement. And no hands!
Do all one side – 6 to 8 R, then L.
This exercise is a really great one for strengthening all these important muscles. You can add even more advanced versions once you get to the battement version and can easily do the 6-8 reps on each side, no hands, staying pretty stable on the foam roller. Try adding arms to the battement version–start with symmetrical arms, like a port de bras, then as you get better with this, try asymmetrical – one arm doing one thing while other one does something else. Adding hand weights would be an even more advanced version.
Step Five: try the same leg tilt as before, but with feet off the floor (hands on). This exercise comes courtesy of Sarah Carrasco:
I love these foam roller exercises – as I taught them over the years, I noticed that they seemed to increase back stabilization (“core”) faster than other exercises I used. We now know, from research, that’s because (as I mentioned above), doing them on an unstable surface, like the foam roller, kicks in a greater percentage of the muscle fibers involved – i.e, they are working harder.
An important side note:
Be careful you don’t get too much neck / facial strain and tension while doing these supine exercises–that’s all too common, and not something you want. Think of warm, flowing images around your face / neck – like warm chocolate sauce gently flowing down!
Foam roller standing.
This last one on the FR is done standing–place the roller parallel to a wall, maybe 5-6 inches out. Stand on the roller, facing the wall, hands on the wall to stabilize. Think of all your good standing alignment cues as you do this.
-Step one you keep hands on the wall and start rolling front and back.
–Step Two is same thing, no hands on the wall!
-Step Three is same thing, hands back on the wall but with eyes closed.
–Step Four is no hands / no eyes!
A very challenging exercise! But a great one for stability / balancing.
All of the exercises above use the various muscles we talked about in Part 1 – TA (transverse abdominus), MTF (mutifidus), PF (pelvic floor), and Psoas. I have used them for years with both dancers and non-dancers, and they are among the best I know for truly strengthening back stabilization.
One more to pass on before we finish.
Pelvic Floor (PF) Walk
This is an adaptation I use from the Franklin Method:
You already know what the PF is / where it’s located, so first you do a “pre-test”: just walk down the hall, your normal tempo, and just notice the PF – no right or wrong, just notice that part of your body.
Then you are going to go for that same walk using lifted PF images. Some of my favorites are:
Imagine the PF as a flying carpet that is lifting as you walk – or a hot air balloon, or an elevator going up, or a water spout from the base of the pelvis……any image that makes sense to you as a lifting idea.
Notice how this idea feels in your body – any different from your normal everyday walk?
Now take that lifted image and drop it, all the way down–the elevator / hot air balloon / flying carpet. How does that feel? Do you still want to continue walking?!
Almost everyone notices instantly that the “lifted” image makes them feel more supported through the torso / lighter / taller (and when you watch them, they always are taller). And when they drop it, it does not feel good at all.
This little exercise is a powerful one for showing both how important the PF is to back stabilization (those lifted images are all kicking in not only PF but the other muscles as well), and how powerful imagery can be. All you do is change the idea in your mind, and you usually instantly feel the difference. Try it!
In conclusion–I hope all this has been helpful. As mentioned, over the years I have found these exercises to be really effective to teach people (including dancers!) about back stabilization, and to strengthen these areas. So give them a try, and I would love to hear your feedback !
Aloha-
Jan

Editor Jan Dunn is a dance medicine specialist currently based on the island of Kauai, Hawaii, where she is owner of Pilates Plus Kauai Wellness Center and co-founder of Kauai Dance Medicine. She is also a Pilates rehabilitation specialist and Franklin Educator. A lifelong dancer / choreographer, she spent many years as university dance faculty, most recently as Adjunct Faculty, University of Colorado Dept. of Theatre and Dance. Her 28 year background in dance medicine includes 23 years with the International Association of Dance Medicine and Science (IADMS) – as Board member / President / Executive Director – founding Denver Dance Medicine Associates, and establishing two university Dance Wellness Programs
Jan served as organizer and Co-Chair, International Dance Medicine Conference, Taiwan 2004, and was founding chair of the National Dance Association’s (USA) Committee on Dance Science and Medicine, 1989-1993. She originated The Dance Medicine/Science Resource Guide; and was co-founder of the Journal of Dance Medicine & Science. She has taught dance medicine, Pilates, and Franklin workshops for medical / dance and academic institutions in the USA / Europe / Middle East / and Asia, authored numerous articles in the field, and presented at many national and international conferences.
Ms. Dunn writes about dance wellness for 4dancers and also brings in voices from the dance wellness/dance medicine field to share their expertise with readers.



Thank you for an amazing article!! Just one question: Is there any way to find out whether you are actually using the correct muscels and not over/underusing a group of muscles?
Aloha — glad you liked the article 🙂
Yes there is — I didn’t go into this, as it’s more from the perspective of an instructor watching / helping someone learn these…..but it’s possible to do yourself. I hope I can explain it well — if you are not clear on what I’m saying here, please let me know !!
Lying supine (on your back), with knees bent, in a neutral pelvis (so do the plop first!) —
-first practice your breathwork — taking a breath and making sure your rib cage is expaning both to the sides and back,not only front……if you have a partner, they can put their hands on the sides of your rib cage and give you feedback (they will feel if the ribs are expanding, or not moving much, to the sides). If you are alone, you can still put one hand on the side of the rib to feel if it is expanding outward.Use images such as mentioned in the article — the sails billowing outwards, balloons expanding, etc.
The reason I’m suggesting you do this first is that it’s eaasier to access using the TA during the actual exercises if the breath is expanding into the full ribcage, rather than just into the front —- this all has to do with the mechanics of breathing, etc.
Once you feel comfortatable with full rib cage expansion, place your hands on the low belly – this is where the TA fibers that we are trying to access are. Inhale, letting the ribs expand fully, and as you exhale, let your belly fall away from your hands, downward (as explained in the article) —-BUT here’s how I can tell if someone is using the Rectus Abdominus (RA – the “six pack” muscle) instead of correctly using TA:
If the person is not accessing TA, but using RA instead, the belly will poke OUTWARD as they exhale, instead of pulling inwards, away from the hands. Sometimes they will START correctly, with the belly falling in, but then suddenly the RA will take over and poke out —meaning the TA is not working.
This is easy for an instructor to see and feel when they’re teaching somone……but it’s possible to do it on yourself, if you are clear on what I am describing.
If you are using TA correctly, it will keep falling inwards (contracting) until it’s time for the next inhale –first practice this, as described above……i.e, inhaling, letting the belly expand along with the ribs, then as you exhale, letting it fall inwards –without RA kicking in (poking out). As you inhale on the next breath, let the belly expand again.
Be careful that you don’t actively try to “pull your belly to your spine” — that cue, while common, usually OVERUSES the TA and does what is called “Bracing” in the PT / exercise physiology world. I mentioned this in the article. One image that I like personally /works for me, on the exhale, is to imagine I have little purse strings all along the inside of my belly, gently pullling towards the center of my body as I exhale.
Now —the above was Step 1 — Step 2 is a little trickier ! As I mentioned in the article, in a healthy back / torso. the TA is working all the time, at about 30-35% of full contractile ability. Step 1 above is using it only on the exhale — now we have to add consicously using it on the inhale as well:
Practice some of the exhale-only versions, as above –when you feel comfortable with that / that you are doing it correctly, try adding HOLDING ON TO THE TA CONTRACTION JUST A BIT as you inhale as well.
The analogy is like this: squeeze your fist hard — that’s a 100% contraction. Now squeeze your fist just a little, maybe less than half the full amount —this is what you are now trying to do with the TA contraction (this is where the full rib expansion part comes in —if you are expaning the ribs only to the front, it’s harder to hold onto TA).
So the full version goes:
-Inhale and on the exhale engage the TA / when you inhale again, HOLD ON to the TA contraction slightly — you will know you are doing it correctly if the belly stays sunken in a bit, and not trying to push out fully (as it does during the inhale-without-holding-on-to-TA version in Step 1).
So that’s the whole thing, as I teach it to both dancers and non-dancers. I hope I described it well enough that you understand what I mean, without being able to visually show you. Let me know if you need any clarification.
And remember — all of this is done in Neutral Pelvis, NEVER flattening your back against the floor (which is what you are often taught in fitness / some Pilates classes, etc., but is totally incorrect).
Good luck !
Jan
THANK YOU so much once again! I´ve been working on using the correct muscles for back stabilization and posture, and this was just the resource I needed to fully understand what I have to do. Your explanations are very clear (and they do make a lot of sense as I have had teachers tell me not to let my belly poke outward, but I couldn´t figure out what I should do differently)!! The only thing that will be left to do after I have gotten used to these exercises is learning how to engage the correct muscles when I´m actually dancing…
Hi again — I actually just saw your last comment –don’t know when you wrote it, but hope you see this response………
In a healthy back / torso, as mentioned in the articles, the “core Stabilizers” –the muscles that comprise that “4 legged stool” –are all working synchronistically / unconsciously to provide back stabilization. We don’t have to think about it. But when we have an injury — whether it’s to our back or limbs –that timing and unconscious patterning goes astray……and that’s where this type of work comes in. The whole goal of this is to practice it intentionally / consciously to the point where it becomes UNconscious again –working as it should without you thinking about it.
As an older dancer, and someone who has had two auto accidents, my body definitely has problems–but if I do this type of work regularly, as well as my Pilates workouts (which keeps my muscles strong and well balanced), then I don’t have any problems. 🙂
I hope you see this, and that it makes sense !
Aloha
Jan
I love all the variations on these TA exercises! I was first given the bent knee version by my PT and it helped my back immensely. I do them almost every day and following every ballet class. + I give them to all my private lesson ballet students
It is such a sense of freedom to be able to call upon that muscle! Excellent series 🙂
Best wishes
Sarah
Thank you for taking the time to give us some feedback on this Sarah! Much appreciated!